
Monday morning, a laptop restarts after a firmware update and stops on the blue BitLocker screen asking for a 48-digit recovery password. The person who uses it says the key is "in my emails somewhere". The asset register lists a serial number and a warranty date, nothing else. Three people then spend two hours in OneDrive, a desk drawer and a former colleague's mailbox while the machine sits unusable on a meeting room table.
That's a custody failure rather than a technology failure. The National Cyber Security Centre sets out the practical position for UK organisations: treat the BitLocker recovery key as a controlled business-critical credential, escrowed centrally, access-controlled, matched to the right device and tested through a documented process. Its guidance also recommends a pre-boot PIN alongside the TPM, which is sensible for travel-heavy staff and one more reason recovery prompts happen in the first place.
A laptop that encrypts but can't be recovered is an unavailable asset, and an encrypted drive with no key is a brick with a warranty. Backing up a BitLocker recovery key is a routine with three parts: a designated primary copy, a verified retrieval, and one offline copy stored away from the machine.
Backup Destinations for a BitLocker Recovery Key Compared
Six places can hold a recovery key. Only two of them should hold yours.
The choice isn't about convenience. It's about who can reach the key at 8:40am on a Monday when the laptop's owner is on leave and the machine needs to be back in service before lunch.
| Destination | Best for | Main risk | Check after saving |
|---|---|---|---|
| Microsoft Entra ID | Entra-joined and hybrid-joined devices | Access depends on account permissions and tenant policy | Key appears under View BitLocker Keys for the device |
| AD DS | Domain-joined Windows devices | Escrow fails silently if the domain controller is unreachable during setup | Recovery object exists in AD DS for the computer |
| External network folder | Small offices without Entra ID or AD DS | File readable by anyone with share access | Path is restricted to support staff and the file opens |
| USB flash drive | Single-user or very small setups | Lost or stolen, or kept next to the computer | Drive is stored away from the device and the file is readable |
| Printed copy | Locked cabinet backup for a few devices | Photocopied, misfiled or left on a desk | Copy is in a locked store and the access log is kept |
| Plain-text file | Quick local save with restricted permissions | Readable by anyone with file access | Permissions block users outside the support team |
Three things matter more than the destination itself.
- The recovery password is what gets backed up. That's the 48-digit number, not the PIN typed at boot. A PIN is useless once a TPM change or a UEFI update pushes the machine into recovery.
- A key is not a backup. Copying the recovery key restores access to an encrypted drive. It does nothing for a file that was deleted, corrupted or lost when an SSD failed. The Cyber Security Breaches Survey 2025 reports that 71% of businesses securely back up data via a cloud service, and it still counts backup as a control in its own right next to encryption. Run both routines and test both.
- Never keep the only copy on the encrypted machine. A key file sitting on the volume it secures is not a backup, it's a hostage.
The rule to apply today: one managed central copy in Entra ID, AD DS or a restricted network share, plus one offline copy held physically apart from the device.
If the file data matters as much as the access, pair key escrow with managed backup solutions so a drive failure doesn't turn a recoverable laptop into a lost quarter of accounts.
How to Back Up the Key to Entra ID or AD DS
Policy-enforced escrow is the only method that scales past a handful of machines, because it doesn't depend on a user doing the right thing at the right moment. Microsoft's BitLocker configuration guidance sets out the supported routes: Entra-joined devices store the recovery key in Microsoft Entra ID, AD-joined devices store it in AD DS, and hybrid-joined devices can back up to both. It also flags the choice most deployments get wrong by accident, which is whether AD DS holds only the recovery password or the recovery password and the key package.
The key package matters. It carries additional recovery information for difficult scenarios, so storing the password alone removes an option you may need months later.

The five steps
- Open the policy for all three drive types. Operating system drives, fixed data drives and removable drives each carry their own recovery settings. Configure all three, because a policy covering only the system volume leaves encrypted USB drives with no escrow at all. The usual slip is one GPO linked to one OU while half the estate sits somewhere else.
- Require storage in Entra ID or AD DS. This is the setting that turns escrow from optional into automatic. Left at not configured, BitLocker will encrypt happily and store nothing centrally.
- Choose what gets stored. Recovery password alone, or recovery password plus key package. Take the package unless a specific constraint prevents it.
- Apply the policy before encryption starts. Microsoft recommends configuring the backup before BitLocker is enabled, although backup after encryption also works. A laptop imaged and handed out the same morning can encrypt before the policy reaches it, so a staged rollout with a soak test on one model beats a big-bang change.
- Confirm escrow for every device before sign-off. Look the computer up in Entra ID and check View BitLocker Keys, or confirm the recovery object exists against the computer account in AD DS. Sign-off means the key is in the directory, not that the build sheet says it should be.
A device that reports encrypted has finished encrypting. That tells you nothing about whether its key reached your directory.
How to Save an Offline Copy Safely
The manual route still exists, and it's worth knowing because it's what you'll use for the odd workgroup machine and the one device that somehow missed the policy.
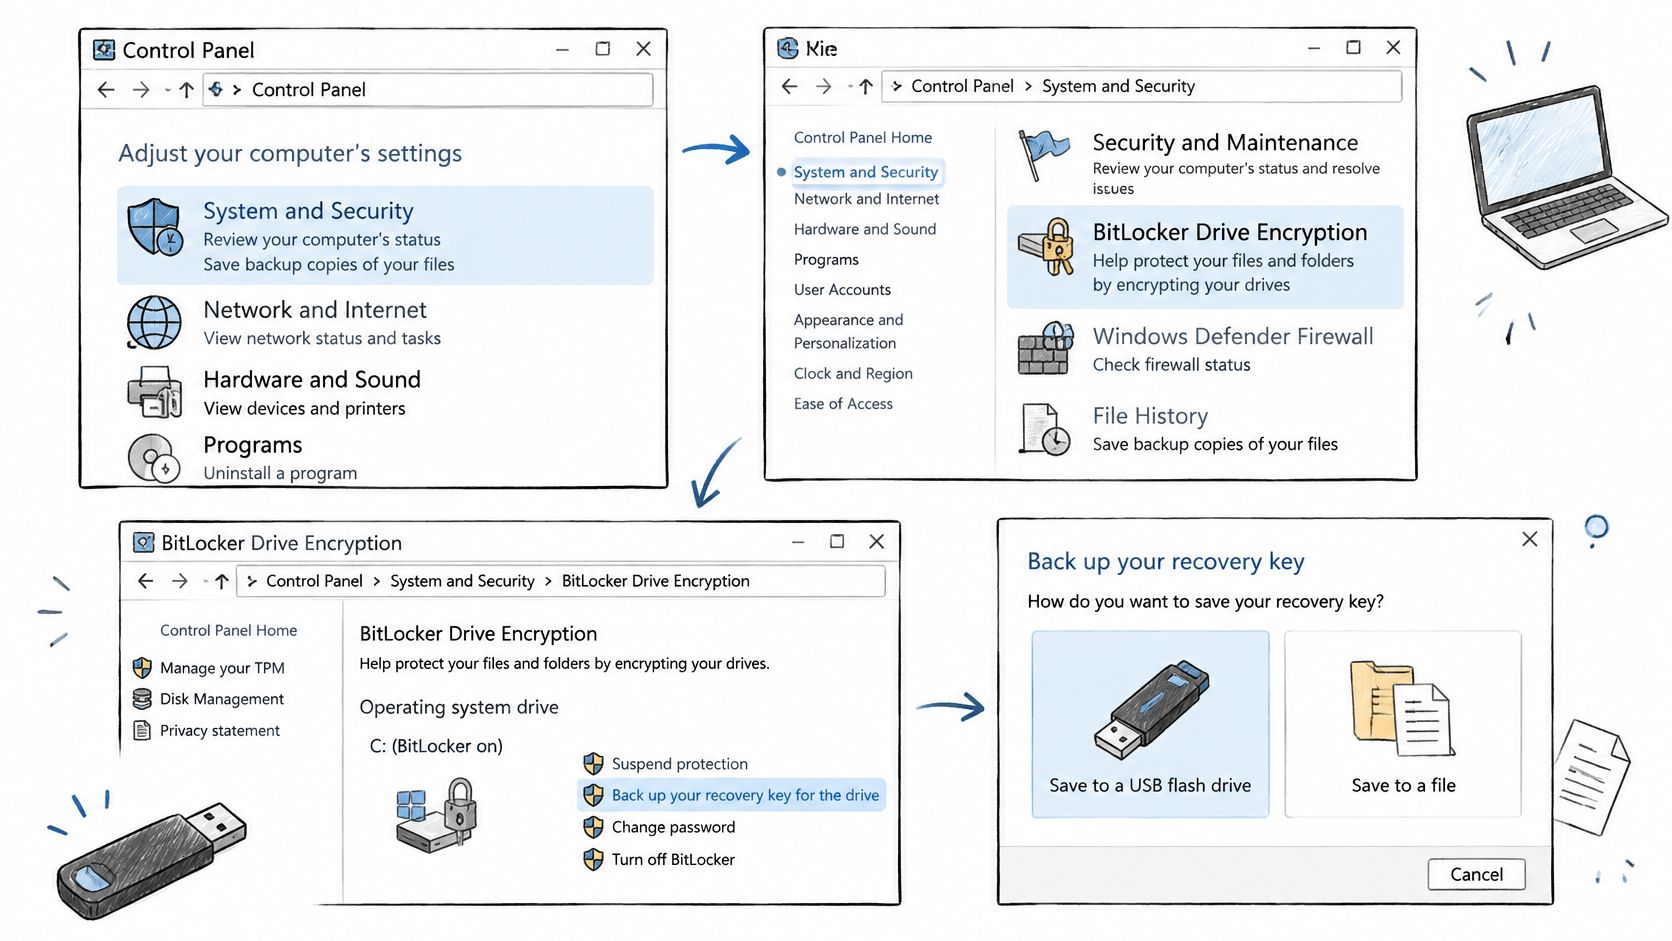
- Open Control Panel, then System and Security.
- Select BitLocker Drive Encryption and find the drive showing BitLocker on.
- Click Back up your recovery key next to that drive.
- Pick a destination from the list Windows offers.
Those destinations include your Microsoft account on a personal device, a save-to-file option, a USB flash drive, or a printed page. Microsoft's guide to backing up your recovery key covers each one and warns that you should verify the backup exists and stays accessible, or create an additional backup.
Storage rules that hold up
- Keep the USB copy away from the laptop. Inserting the stick at the recovery prompt lets Windows read the saved key, so a drive living in the laptop bag travels with the problem rather than solving it.
- Lock down any plain-text file. A key file readable by the whole staff share is a credential leak waiting for a curious user.
- Log the printed copies. Locked cabinet, named keyholder, access log, and the recovery identifier written on the sleeve so you can match it without unfolding the page.
- Record the copy against the asset register. The entry should say where the copy is and who holds access, not just that one exists.
A three-laptop charity can run this in an afternoon: one labelled USB stick per device, held in the safe with the recovery identifier on the sleeve, and a line in the asset register naming the safe and the person who holds the code.
On a single home PC signed in with a Microsoft account, the key is saved to that account, so the household can read it by signing in from a phone. Record the account email in the same secure place as the offline copy. Never write the account password next to the key.
Verify, Retrieve and Fix Backup Problems
Verification is a lookup, not an assumption. Everything in this routine hangs on one detail: the BitLocker preboot screen shows a 48-digit recovery-password identifier, and that identifier is what you search. Not the user's name, not the asset tag, not the device name in the console. Microsoft's BitLocker recovery process guidance puts identifier matching first, because a valid key applied to the wrong volume does nothing except waste the caller's morning.
Match the identifier, then release the key
- Open the right console. For an Entra-managed device, sign in to the Microsoft Entra admin centre, find the computer and open View BitLocker Keys. For AD DS, confirm the recovery object sits against the computer account, which means the BitLocker Recovery Password Viewer installed on the admin workstation.
- Capture the identifier from the screen. Photograph it or type it, then read it back before searching. A single transposed digit sends you down a dead end and makes a sound key look missing.
- Confirm ownership first. Check the device identity and the person holding it before the key moves anywhere. The identifier and the device must agree.
- Handle duplicates with a rule. Where several records exist, prefer backups confirmed as successful and, among duplicates, the most recent backup date.
- Release under a two-person check. One person retrieves, another confirms the identifier against the call. Record the recovery-event timestamp, because the ticket will be asked about later.

Microsoft's BitLocker recovery overview is blunt about a failure mode that catches people out: if the initial AD DS backup fails because a domain controller is unreachable, BitLocker doesn't retry it. Setup can wait up to 60 seconds for network connectivity and then carry on without escrow. That's why the audit after provisioning matters more than the policy document. A green tick on the encryption job tells you the volume is protected; it says nothing about whether the key landed anywhere you can reach it.
Test after firmware, TPM and boot changes
A retrieval test that passed in March proves nothing after a UEFI update in June. Run one recovery end to end on representative Windows 11 hardware after firmware updates, TPM clears and boot configuration changes, and treat a failed test as a change-control blocker rather than a nice-to-have.
Practical rule: if the identifier on screen doesn't match the record you found, stop there. Continue only once device identity and identifier both agree.
Symptoms, causes and fixes
| Symptom | Likely cause | Fix |
|---|---|---|
| No key in Entra ID after encryption | Policy not set before enabling BitLocker, or device offline | Confirm the policy, then back up the key from BitLocker settings |
| No AD DS recovery object | Domain controller unreachable during setup; no automatic retry | Re-run the backup once connected and confirm the object exists |
| Several keys for one device | Repeated backups or re-encryption | Use the most recent successful backup that matches the recovery identifier |
| USB key not read at recovery prompt | Wrong drive, damaged file or port issue | Try another port, check the file and compare the identifier |
| Recovery identifier does not match | Key belongs to another device or volume | Stop, recheck the identifier and device name before continuing |
Track how often retrievals succeed on the first attempt using your own service-desk tickets, and investigate every failure as a gap in the backup routine rather than a one-off.
Keeping Recovery Keys Secure When Staff or Devices Change
The worst moment to find a custody gap is a factory reset. UK Cabinet Office guidance on factory reset and device reprovisioning warns that resetting a BitLocker device can delete the decryption key rather than overwrite every sector, which makes recovery of the encrypted data impossible, and that clearing the Trusted Platform Module can do the same. A key held only on the laptop, or only in one employee's mailbox, is precisely the key that isn't there when the machine gets wiped.
A custody routine that survives staff turnover
- Name an owner for the key store. One accountable person, not a shared mailbox everyone assumes someone else checks.
- Restrict retrieval to authorised support staff. Directory roles and share permissions should match the list, and the list should be reviewed, not inherited from a 2019 build document.
- Check key custody during offboarding, before accounts are removed. Delete the mailbox and you may delete the only route to a printed or emailed copy.
- Clear out stale records. Remove keys when a device is retired or re-enrolled, so a future search doesn't return four candidates and no confidence.
- Fold key handling into your wider corporate IT security controls, alongside joiner, mover and leaver checks.
Say a mid-sized firm finds a leaver's USB copy in a desk drawer during a clear-desk sweep. Someone moves it into the safe and writes a dated log entry against the device's asset record. That single entry is the difference between a controlled credential and an unmanaged one.
Scattered copies don't add resilience. Screenshots in chat, keys pasted into a spreadsheet on a personal OneDrive, paper taped inside a laptop bag: each one widens the attack surface without improving your chance of recovery. Two controlled locations beat six that nobody owns.
Confirm Your Key Backups Before Your Next Change
A feature update lands, a leaver's laptop gets reimaged, a motherboard dies on a Friday afternoon. Any of those turns a missing recovery key into a locked device, so run this list before the next change rather than after it.
- List every device with its encryption status and whether it holds a recovery password.
- Confirm each key exists in Entra ID or AD DS, or in a documented offline store with a named holder.
- Check that offline copies sit apart from their devices and are recorded against the asset register.
- Run one retrieval end to end using the identifier-matching rule, on a machine you can take out of service for an hour.
- Record the named owner of the key store and the date of the last review.
The last two items are where custody becomes real. A key store with a named owner and a dated review is a controlled credential. A folder everyone assumes someone else maintains is a hope. Any check that fails is a gap to close before the next rollout.
Recovery testing gets skipped because it is dull, and the cost lands later. A survey of 200 UK IT security decision-makers found that 31% of UK organisations were unable to fully recover data from backups, or failed entirely, in 2025. That figure covers backups in general, and it makes the point well: when a third of organisations cannot restore data they deliberately copied, an untested recovery key stands little chance. Put the retrieval test on the same schedule as the backup test, and treat it as part of your wider IT disaster recovery process.
Use the same list as the agenda for a review with us, so gaps close in one visit instead of stretching across months of half-finished tickets. F1Group has supported organisations across the East Midlands since 1995 with Microsoft-focused managed IT. If any of these checks comes back incomplete, send us a message through our contact page and we will reply with next steps for a recovery-key backup review.